Deploy a Highly Available Group of EC2 Instances Using Terraform

DevOps Enthusiast ♾️ | Cloud Computing ☁️ | Linux🐧| AWS 🖥 | Python 🐍 | Docker ⚓ | Kubernets 🛞 | Terraform ⚙️ | Connect with me on LinkedIn www.linkedin.com/in/mohammedaffan7
Introduction:
In this article, you'll learn how to deploy a highly available group of EC2 Instances using Terraform, load balancer and autoscaling group.
High Availability:
High availability (HA) refers to the continuous availability of your application and data regardless of any downtime. In other words, if your web application is available 24/7 to serve your customers or clients without any downtime, it's called a highly available web app.
High Scalability:
High Scalability refers to the ability of an application or a system to handle a huge volume of workload or expand in response to an increased demand for an application. For example, suppose you have an online shopping website running on a fleet of ten web servers and you plan for a discount sale. This sale will be going to increase the workload on your servers. So you anticipate the network traffic and you add 5 more servers to host your shopping website and avoid any downtime. Which means you have scaled your infrastructure. This ability of your application to scale is called high scalability. So the more scalable your application the more available it's. So high scalability and high availability are correlated but not the same.
Terraform:
Terraform is an infrastructure as a code (IaC) tool. We can provision the cloud infrastructure using Terraform. It's similar to AWS cloud-formation but it can work with almost any cloud platform. Usually, if you want to create some cloud infrastructure for example an EC2(virtual machine on the cloud), you will go to the AWS console using your browser and then click on the launch instance button. This sounds easy and quick, but at some point, as the infrastructure gets larger and larger, it becomes difficult and tedious to manage such a large infrastructure manually by using only the AWS console. To solve this problem we can use Terraform.
Imagine manually creating hundreds of EC2 instances of different types and configurations. It would be tedious and time-consuming right? Now imagine a software to which you can tell to create these hundreds of EC2 instances for you, and it does this job for you in a few minutes. Wouldn't it be amazing? This is exactly what Terraform does.
We can describe our desired infrastructure to the Terraform using the code and the Terraform will do the provisioning for us. For example, take a look at the following piece of code.
resource "aws_instance" "web" {
  instance_type = "t2.micro"
}
This code describes to provision an EC2 instance. (In case If you're wondering how did I get this piece of code, here is the link to the documentation https://registry.terraform.io/providers/hashicorp/aws/latest/docs/resources/instance)
Terraform installation:
To install the Terraform for your specific operating system refer to this documentation https://developer.hashicorp.com/terraform/tutorials/aws-get-started/install-cli
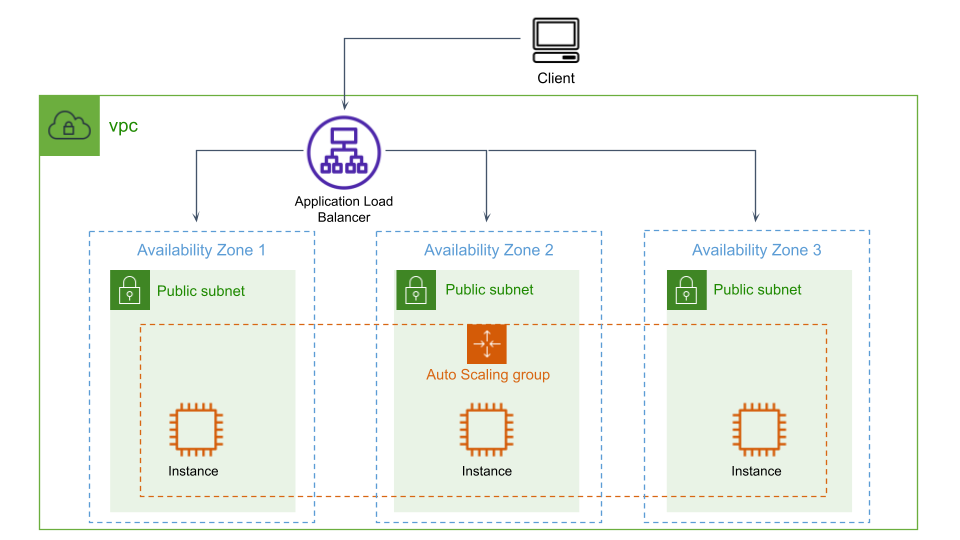
Architecting our application:
We want the application to be highly available. To achieve high availability we can launch our EC2 instances in multiple Availability zones. Furthermore, autoscaling scaling and load-balancing would be required to achieve high availability. To satisfy these requirements we will use the following architecture.
Create Terraform configuration file:
To get started with Terraform create a file named main.tf inside an empty folder and open the file inside your favourite code editor.
Terraform is a tool that can work with multiple cloud platforms such as AWS, Azure and GCP etc.
In this article, we will be working with AWS. To use Terraform with AWS or any other cloud provider you need to install a plugin for that cloud provider first. These platform-specific Terraform plugins are called providers. You can browse all of the available Terraform providers from the following page https://registry.terraform.io/browse/providers
To use the AWS provider go to the following page https://registry.terraform.io/providers/hashicorp/aws/latest
Then click on the use provider button to see the instruction for using the provider. You can also view the provider documentation by clicking on the Documentation button.
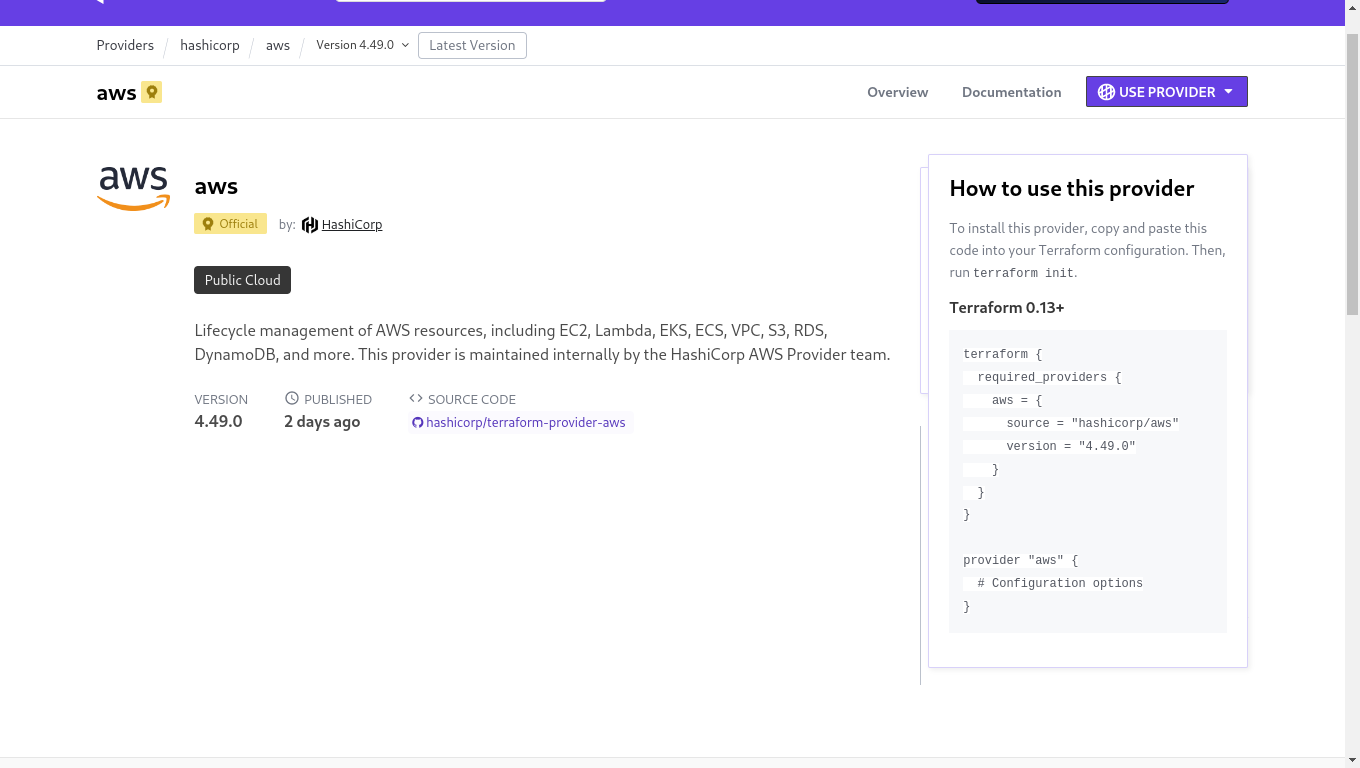
Copy and paste the code inside the main.tf file like the following.
terraform {
  required_providers {
    aws = {
      source = "hashicorp/aws"
      version = "4.49.0"
    }
  }
}

provider "aws" {
  # Configuration options
}
And run the following shell command inside the terminal.
$ terraform init
This command will download the provider that you've specified in the main.tf file.
After running the 'terraform init' command you will see that there is a new '.terraform' hidden folder. This folder contains all the provider modules and configuration files. You should not make changes in this folder.
Now back to our 'main.tf' file. You need to specify the AWS region, AWS access key and AWS secret key inside the provider block like the following.
provider "aws" {
  region     = "us-east-1"
  access_key = "my-access-key"
  secret_key = "my-secret-key"
}
If you don't want to hardcode the access key and secret key inside the Terraform file you can download the AWS CLI tool and configure the CLI tool using these keys. So at the runtime Terraform will dynamically get the keys from the ~/.aws/config file.
Create resources inside Terraform file:
Now we will create the components required by our architecture one by one.
VPC:
Let's start by creating a VPC. To create a VPC use the following code.
resource "aws_vpc" "main" {
  cidr_block = "10.0.0.0/16"

  tags = {
    Name = "my-app-vpc"
  }
}
As you can see the code contains a resource block. The "aws_vpc" is the resource type you want to create. The "main" is the name of the resource in the context of Terraform, not in the context of AWS. That means the VPC resource that we are going to create can be represented as 'aws_vpc.main' in the Terraform code. But in AWS our VPC is not named as 'main' instead it's named as 'my-app-vpc' because of the tags.
You can add AWS tags to the resources using the tags block. In the given code snippet we have also provided the CIDR block using the 'cidr_block' attribute. Terraform code is very similar to any object-oriented programming language. For example, if we want to access the VPC id of the VPC that we are going to create, we can use ''aws_vpc.main.id" to get the VPC id. This syntax is pretty much similar to the object-oriented programming languages.
Remember that you can always search the AWS resources in the Terraform documentation. https://registry.terraform.io/providers/hashicorp/aws/latest/docs/resources
Subnets:
Now let's create three public subnets in three different availability zones as shown in the architecture. Use the following code to create these subnets.
resource "aws_subnet" "public_a" {
  vpc_id     = aws_vpc.main.id
  cidr_block = "10.0.1.0/24"
  availability_zone = "us-east-1a"

  tags = {
    Name = "public_a"
  }
}

resource "aws_subnet" "public_b" {
  vpc_id     = aws_vpc.main.id
  cidr_block = "10.0.2.0/24"
  availability_zone = "us-east-1b"

  tags = {
    Name = "public_b"
  }
}

resource "aws_subnet" "public_c" {
  vpc_id     = aws_vpc.main.id
  cidr_block = "10.0.3.0/24"
  availability_zone = "us-east-1c"

  tags = {
    Name = "public_c"
  }
}
Here we are using the 'aws_subent' resource to create three subnets'. Inside the resource block, we are specifying the VPC id in which we want to create our subnets using 'vpc_id = aws_vpc.main.id' attribute. We have also specified different availability zone for each subnet using the 'availability_zone' attribute. I encourage you to look up these attributes in the Terraform AWS provider documentation.
Internet Gateway:
Now we have created the subnets but still, our VPC don't have any internet access. Because we haven't created the Internet Gateway yet. To create an Internet gateway use the following code.
resource "aws_internet_gateway" "main-igw" {
  vpc_id = aws_vpc.main.id

  tags = {
    Name = "main-igw"
  }
}
In this 'aws_internet_gateway' resource block we have specified our VPC using 'vpc_id = aws_vpc.main.id' attribute, as well as we have provided a tag to our Internet gateway.
Route Table:
We are still missing out the route table. To create a route table use the following code snippet.
resource "aws_route_table" "public_rt" {
  vpc_id = aws_vpc.main.id

  route {
    cidr_block = "0.0.0.0/0"
    gateway_id = aws_internet_gateway.main-igw.id
  }

  tags = {
    Name = "public_rt"
  }
}
To specify routes in the route table we have used the 'route' block inside our resource block. And we've added a route for '0.0.0.0/0' which means all the possible public internet IPv4 addresses and specified the target address of the internet gateway using 'gateway_id = aws_internet_gateway.main-igw.id' attribute.
Route Table Association:
Now we need to associate our public route table with all three public subnets. We can achieve this by using the following code.
resource "aws_route_table_association" "a" {
  subnet_id      = aws_subnet.public_a.id
  route_table_id = aws_route_table.public_rt.id
}

resource "aws_route_table_association" "b" {
  subnet_id      = aws_subnet.public_b.id
  route_table_id = aws_route_table.public_rt.id
}

resource "aws_route_table_association" "c" {
  subnet_id      = aws_subnet.public_c.id
  route_table_id = aws_route_table.public_rt.id
}
The 'aws_route_table_association' resource block requires only two attributes 'subnet_id' and 'route_table_id'.
Security Group:
Now our subnets have internet access. That means it's time for a security group. Use the following code to create a security group.
resource "aws_security_group" "my_sg" {
  name        = "my-sg"
  vpc_id      = aws_vpc.main.id

  ingress {
    description      = "Allow http from everywhere"
    from_port        = 80
    to_port          = 80
    protocol         = "tcp"
    cidr_blocks      = ["0.0.0.0/0"]
  }

  ingress {
    description      = "Allow http from everywhere"
    from_port        = 22
    to_port          = 22
    protocol         = "tcp"
    cidr_blocks      = ["0.0.0.0/0"]
  }

  egress {
    description      = "Allow outgoing traffic"
    from_port        = 0
    to_port          = 0
    protocol         = "-1"
    cidr_blocks      = ["0.0.0.0/0"]
  }

  tags = {
    Name = "my-sg"
  }
}
This code snippet might look a little bit longer but don't get overwhelmed it's pretty easy to understand. In this 'aws_security_group' resource block, we have specified the name of our security group using the 'name' attribute as well as the VPC id using 'vpc_id'. The resource block has two ingress blocks and a single egress block. The ingress stands for inbound traffic and the egress stands for outbound traffic. These blocks are the rules of our security group.
Both ingress and egress contain 5 similar attributes. With 'description' we can provide any arbitrary description to the rule. 'from port' and 'to_port' define the port range for the rule. The 'protocol' attributes define the protocols to allow, valid options are tcp, udp, icmp and -1 etc (refer docs for more details). The '-1' protocol stands for all protocols.
Load Balancer:
Let's create a load balancer as defined in the architecture. There are multiple types of load balancers provided by the AWS. In this case, we will create an application load balancer using the following code.
resource "aws_lb" "my_alb" {
  name               = "my-alb"
  internal           = false
  load_balancer_type = "application"
  security_groups    = [aws_security_group.my_sg.id]
  subnets            = [aws_subnet.public_a.id, aws_subnet.public_b.id, aws_subnet.public_c.id]
}
In AWS we can create either an internal or an external load balancer. We need our load balancer to be publically accessible that's why we've used the 'internal = false' attribute. We've used all three subnets for the load balancer. The rest of the code is pretty much intuitive and self-explanatory.
Listener for Load Balancer:
After creating the load balancer, we need to add the listener ports to the load balancer.
resource "aws_lb_listener" "my_lb_listener" {
  load_balancer_arn = aws_lb.my_alb.arn
  port              = "80"
  protocol          = "HTTP"

  default_action {
    type             = "forward"
    target_group_arn = aws_lb_target_group.my_tg.arn
  }
}
Here we've created a load balancer listener and attached it with the load balancer using the load balancer arn(amazon resource name). While creating the listener we need to specify the target group to which the load balancer will send the traffic.
Target Group:
By using this target group we can forward the traffic of our load balancer to the EC2 instances which will be managed by an autoscaling group. The 'target_type' could be lambda functions, databases, EC2 instances etc.
resource "aws_lb_target_group" "my_tg" {
  name     = "my-tg"
  target_type = "instance"
  port     = 80
  protocol = "HTTP"
  vpc_id   = aws_vpc.main.id
}
Launch Template:
After creating the target group we need to create an autoscaling group. But the autoscaling group have a prerequisite, a launch template. So let's create a launch template for our autoscaling group.
resource "aws_launch_template" "my_launch_template" {

  name = "my_launch_template"

  image_id = "ami-06878d265978313ca"
  instance_type = "t2.micro"
  key_name = "ubuntu"

  user_data = filebase64("${path.module}/server.sh")

  block_device_mappings {
    device_name = "/dev/sda1"

    ebs {
      volume_size = 8
      volume_type = "gp2"
    }
  }

  network_interfaces {
    associate_public_ip_address = true
    security_groups = [aws_security_group.my_sg.id]
  }
}
In the launch template, we've provided various attributes such as instance type, EBS volume type and size, ssh key name etc. I have copied and pasted the AMI id of an ubuntu instance into the 'image_id' field. This AMI will get outdated over time. Furthermore, these AMI id's are different for each AWS region. There is a more sophisticated way to dynamically fetch the latest AMI id for the specific region. But for the sake of simplicity, I have just hardcoded the AMI (you can also use your own custom AMI).
We can provide a shell script to the EC2 instance using the user data. The user data script runs only once at the time of the instance launch. This user data can be provided using the 'user_data' attribute. The user data script needs to be base64 encoded that's why we are using the filebase64() function of the Terraform. The ${path.module} variable points towards the current path of the Terraform directory. In the same directory, I have created a user data script named server.sh
Server.sh:
#!/bin/bash
apt update
apt upgrade -y
apt install apache2 -y
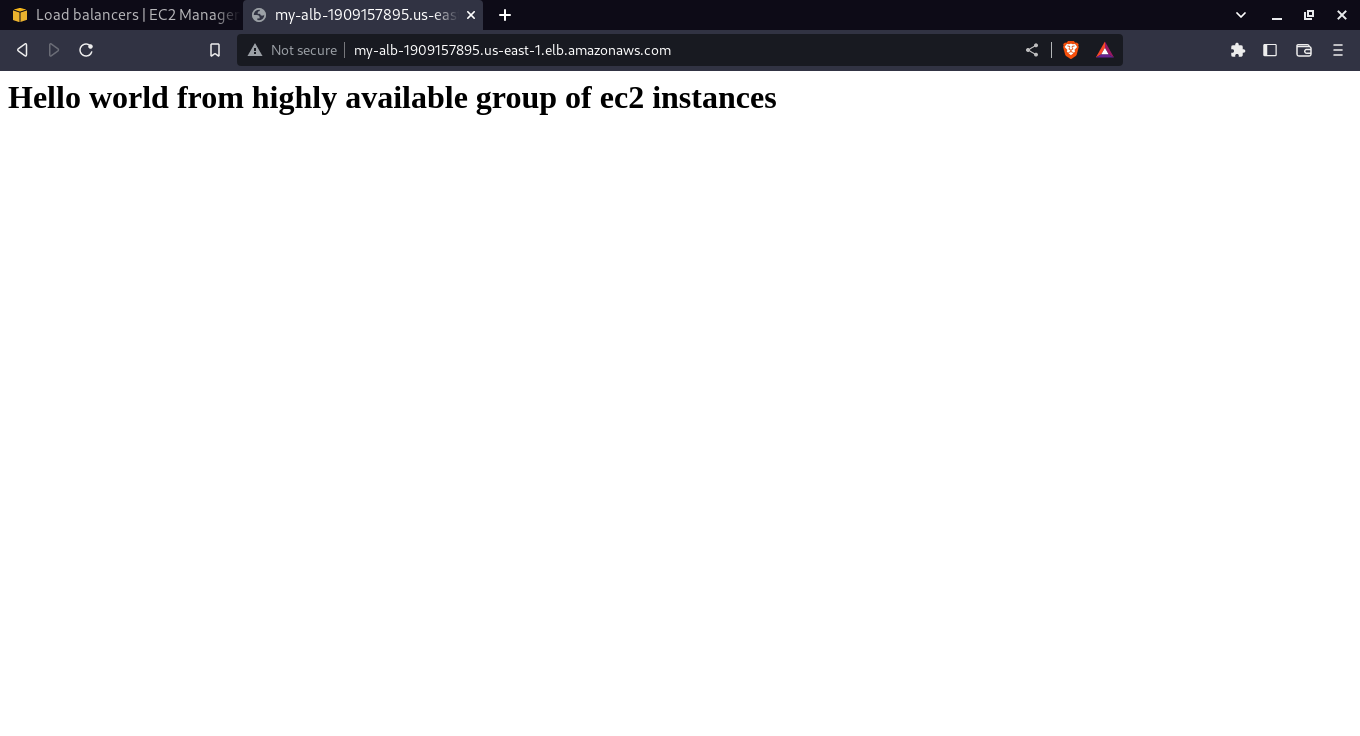
echo "<h1>Hello world from highly available group of ec2 instances</h1>" > /var/www/html/index.html
systemctl start apache2
systemctl enable apache2
The EC2 user data script executes with the root permissions by default. Therefore we don't need to add sudo.
Autoscaling Group:
We have created the launch template for our autoscaling group. Now we can create the autoscaling group.
resource "aws_autoscaling_group" "my_asg" {
  name                      = "my_asg"
  max_size                  = 5
  min_size                  = 2
  health_check_type         = "ELB"    # optional
  desired_capacity          = 2
  target_group_arns = [aws_lb_target_group.my_tg.arn]

  vpc_zone_identifier       = [aws_subnet.public_a.id, aws_subnet.public_b.id, aws_subnet.public_c.id]

  launch_template {
    id      = aws_launch_template.my_launch_template.id
    version = "$Latest"
  }
}
In this autoscaling group, we've defined some essential attributes such as maximum and minimum instance capacity, desired capacity, subnets, launch template etc. The 'health_check_type = "ELB"' attributes enable the additional ELB health checks.
The 'target_group_arns' specifies the target group to our autoscaling group. When the autoscaling group creates the instances it will automatically register those instances to the specified target group. This is the same target group which is also used by the load balancer to forward the network traffic.
The launch template can be updated and hence may have many versions. Here we are specifying 'version = "$Latest"' to use the latest launch template version.
Autoscaling Policies and CloudWatch Alarms:
Now we are done with the autoscaling group and the load balancer. But there is one more last thing to create which is an autoscaling policy. We will scale our instances based on the CPU utilization. To set up an autoscaling policy we will use the simple scaling policy with cloud-watch alarms.
Scale-up policy:
resource "aws_autoscaling_policy" "scale_up" {
  name                   = "scale_up"
  policy_type            = "SimpleScaling"
  autoscaling_group_name = aws_autoscaling_group.my_asg.name
  adjustment_type        = "ChangeInCapacity"
  scaling_adjustment     = "1"      # add one instance
  cooldown               = "300"    # cooldown period after scaling
}
Scale-up cloud-watch alarm:
resource "aws_cloudwatch_metric_alarm" "scale_up_alarm" {
  alarm_name          = "scale-up-alarm"
  alarm_description   = "asg-scale-up-cpu-alarm"
  comparison_operator = "GreaterThanOrEqualToThreshold"
  evaluation_periods  = "2"
  metric_name         = "CPUUtilization"
  namespace           = "AWS/EC2"
  period              = "120"
  statistic           = "Average"
  threshold           = "50"
  dimensions = {
    "AutoScalingGroupName" = aws_autoscaling_group.my_asg.name
  }
  actions_enabled = true
  alarm_actions   = [aws_autoscaling_policy.scale_up.arn]
}
Scale-down policy:
resource "aws_autoscaling_policy" "scale_down" {
  name                   = "asg-scale-down"
  autoscaling_group_name = aws_autoscaling_group.my_asg.name
  adjustment_type        = "ChangeInCapacity"
  scaling_adjustment     = "-1"
  cooldown               = "300"
  policy_type            = "SimpleScaling"
}
Scale-down cloud-watch alarm:
resource "aws_cloudwatch_metric_alarm" "scale_down_alarm" {
  alarm_name          = "asg-scale-down-alarm"
  alarm_description   = "asg-scale-down-cpu-alarm"
  comparison_operator = "LessThanOrEqualToThreshold"
  evaluation_periods  = "2"
  metric_name         = "CPUUtilization"
  namespace           = "AWS/EC2"
  period              = "120"
  statistic           = "Average"
  threshold           = "30"
  dimensions = {
    "AutoScalingGroupName" = aws_autoscaling_group.my_asg.name
  }
  actions_enabled = true
  alarm_actions   = [aws_autoscaling_policy.scale_down.arn]
}
I hope now you get the idea of the Terraform syntax and you can comprehend these policies and alarms on your own.
End Result:
In the end, your complete Terraform file should look like the following.
terraform {
  required_providers {
    aws = {
      source = "hashicorp/aws"
      version = "4.49.0"
    }
  }
}

provider "aws" {
  region     = "us-east-1"
  access_key = "my-access-key"
  secret_key = "my-secret-key"
}

resource "aws_vpc" "main" {
  cidr_block = "10.0.0.0/16"

  tags = {
    Name = "my-app-vpc"
  }
}

resource "aws_subnet" "public_a" {
  vpc_id     = aws_vpc.main.id
  cidr_block = "10.0.1.0/24"
  availability_zone = "us-east-1a"

  tags = {
    Name = "public_a"
  }
}

resource "aws_subnet" "public_b" {
  vpc_id     = aws_vpc.main.id
  cidr_block = "10.0.2.0/24"
  availability_zone = "us-east-1b"

  tags = {
    Name = "public_b"
  }
}

resource "aws_subnet" "public_c" {
  vpc_id     = aws_vpc.main.id
  cidr_block = "10.0.3.0/24"
  availability_zone = "us-east-1c"

  tags = {
    Name = "public_c"
  }
}

resource "aws_internet_gateway" "main-igw" {
  vpc_id = aws_vpc.main.id

  tags = {
    Name = "main-igw"
  }
}

resource "aws_route_table" "public_rt" {
  vpc_id = aws_vpc.main.id

  route {
    cidr_block = "0.0.0.0/0"
    gateway_id = aws_internet_gateway.main-igw.id
  }

  tags = {
    Name = "public_rt"
  }
}

resource "aws_route_table_association" "a" {
  subnet_id      = aws_subnet.public_a.id
  route_table_id = aws_route_table.public_rt.id
}

resource "aws_route_table_association" "b" {
  subnet_id      = aws_subnet.public_b.id
  route_table_id = aws_route_table.public_rt.id
}

resource "aws_route_table_association" "c" {
  subnet_id      = aws_subnet.public_c.id
  route_table_id = aws_route_table.public_rt.id
}

resource "aws_security_group" "my_sg" {
  name        = "my-sg"
  vpc_id      = aws_vpc.main.id

  ingress {
    description      = "Allow http from everywhere"
    from_port        = 80
    to_port          = 80
    protocol         = "tcp"
    cidr_blocks      = ["0.0.0.0/0"]
  }

  ingress {
    description      = "Allow http from everywhere"
    from_port        = 22
    to_port          = 22
    protocol         = "tcp"
    cidr_blocks      = ["0.0.0.0/0"]
  }

  egress {
    description      = "Allow outgoing traffic"
    from_port        = 0
    to_port          = 0
    protocol         = "-1"
    cidr_blocks      = ["0.0.0.0/0"]
  }

  tags = {
    Name = "my-sg"
  }
}

resource "aws_lb" "my_alb" {
  name               = "my-alb"
  internal           = false
  load_balancer_type = "application"
  security_groups    = [aws_security_group.my_sg.id]
  subnets            = [aws_subnet.public_a.id, aws_subnet.public_b.id, aws_subnet.public_c.id]
}

resource "aws_lb_listener" "my_lb_listener" {
  load_balancer_arn = aws_lb.my_alb.arn
  port              = "80"
  protocol          = "HTTP"

  default_action {
    type             = "forward"
    target_group_arn = aws_lb_target_group.my_tg.arn
  }
}

resource "aws_lb_target_group" "my_tg" {
  name     = "my-tg"
  target_type = "instance"
  port     = 80
  protocol = "HTTP"
  vpc_id   = aws_vpc.main.id
}

resource "aws_launch_template" "my_launch_template" {

  name = "my_launch_template"

  image_id = "ami-06878d265978313ca"
  instance_type = "t2.micro"
  key_name = "ubuntu"

  user_data = filebase64("${path.module}/server.sh")

  block_device_mappings {
    device_name = "/dev/sda1"

    ebs {
      volume_size = 8
      volume_type = "gp2"
    }
  }

  network_interfaces {
    associate_public_ip_address = true
    security_groups = [aws_security_group.my_sg.id]
  }
}

resource "aws_autoscaling_group" "my_asg" {
  name                      = "my_asg"
  max_size                  = 5
  min_size                  = 2
  health_check_type         = "ELB"
  desired_capacity          = 2
  target_group_arns = [aws_lb_target_group.my_tg.arn]

  vpc_zone_identifier       = [aws_subnet.public_a.id, aws_subnet.public_b.id, aws_subnet.public_c.id]

  launch_template {
    id      = aws_launch_template.my_launch_template.id
    version = "$Latest"
  }
}

resource "aws_autoscaling_policy" "scale_up" {
  name                   = "scale_up"
  policy_type            = "SimpleScaling"
  autoscaling_group_name = aws_autoscaling_group.my_asg.name
  adjustment_type        = "ChangeInCapacity"
  scaling_adjustment     = "1"    # add one instance
  cooldown               = "300"  # cooldown period after scaling
}

resource "aws_cloudwatch_metric_alarm" "scale_up_alarm" {
  alarm_name          = "scale-up-alarm"
  alarm_description   = "asg-scale-up-cpu-alarm"
  comparison_operator = "GreaterThanOrEqualToThreshold"
  evaluation_periods  = "2"
  metric_name         = "CPUUtilization"
  namespace           = "AWS/EC2"
  period              = "120"
  statistic           = "Average"
  threshold           = "50"
  dimensions = {
    "AutoScalingGroupName" = aws_autoscaling_group.my_asg.name
  }
  actions_enabled = true
  alarm_actions   = [aws_autoscaling_policy.scale_up.arn]
}

resource "aws_autoscaling_policy" "scale_down" {
  name                   = "asg-scale-down"
  autoscaling_group_name = aws_autoscaling_group.my_asg.name
  adjustment_type        = "ChangeInCapacity"
  scaling_adjustment     = "-1"
  cooldown               = "300"
  policy_type            = "SimpleScaling"
}

resource "aws_cloudwatch_metric_alarm" "scale_down_alarm" {
  alarm_name          = "asg-scale-down-alarm"
  alarm_description   = "asg-scale-down-cpu-alarm"
  comparison_operator = "LessThanOrEqualToThreshold"
  evaluation_periods  = "2"
  metric_name         = "CPUUtilization"
  namespace           = "AWS/EC2"
  period              = "120"
  statistic           = "Average"
  threshold           = "30"
  dimensions = {
    "AutoScalingGroupName" = aws_autoscaling_group.my_asg.name
  }
  actions_enabled = true
  alarm_actions   = [aws_autoscaling_policy.scale_down.arn]
}
To check whether you have any syntactical mistakes in your file you can run the following command.
$ terraform plan
This will also give you an overview of the resource that needs to be created, modified or destroyed.
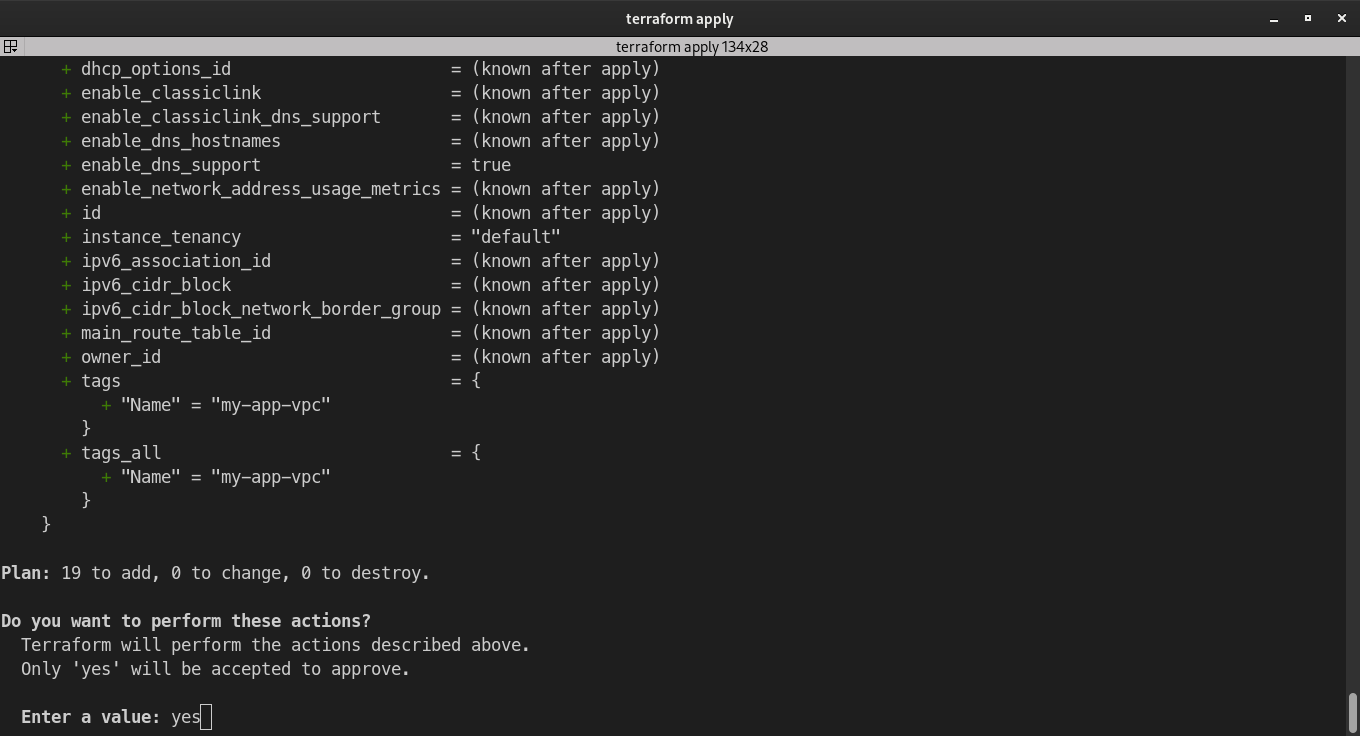
To deploy this Terraform configuration use the following command.
$ terraform apply
It will prompt you for confirmation so type yes, and press enter.
After a few minutes, your infrastructure will be deployed successfully. When the deployment is finished you can see all of your resources through the AWS console. To access your web server copy the DNS name of your load balancer and paste it into the browser and you should see the following output. It may take some time for EC2 user data script to be executed completely so please wait a few seconds.
Terminate the Resources:
After provisioning the infrastructure, at some point, you may want to terminate all the resources that are created by the Terraform, to avoid a surprise bill from AWS. Terminating the resources is super easy in terraform. To terminate the resources use the following command and it will delete all the resources created by the Terraform.
$ terraform destroy
It will prompt you for confirmation so you need to type 'yes'.


